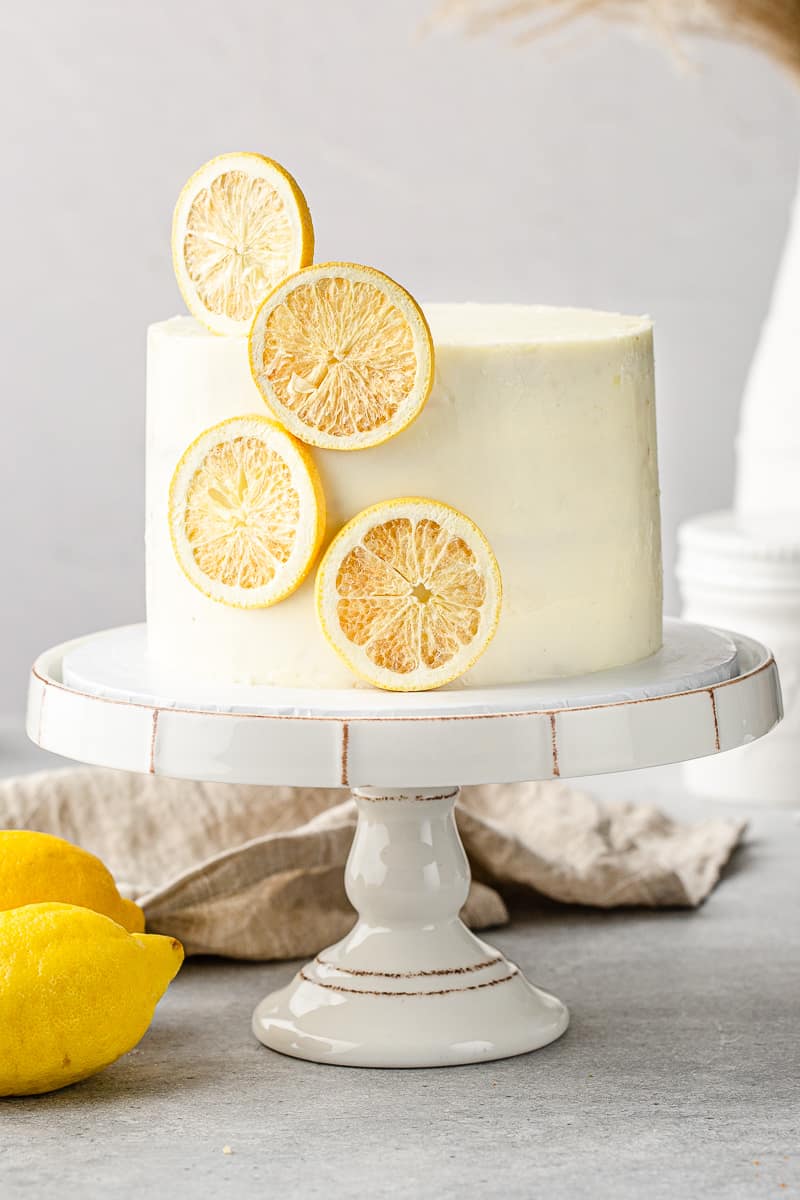
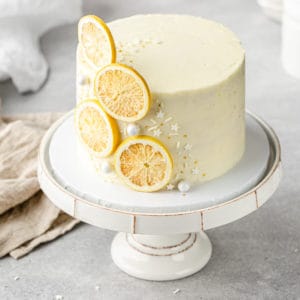
This one is for the lemon lovers! This Lemon Layer Cake is fluffy, but still moist, with rich lemon buttercream in between each layer. The lemon flavor is tangy and bright, and the buttermilk in the batter helps it to stay delicious days after baking.

Amping Up the Lemon Flavor
I am a huge lemon fan (could you guess by the name of my blog??) and this cake packs a big lemon punch. It's fluffy in texture, but not dry, and the buttercream adds both richness and even more tanginess.
To add lemon flavor to a cake, I find it's best to use fresh lemons. We'll zest the peel and combine it with the sugar, which extracts some of the oils of the peel and gives a great fragrance to the cake. We'll also add in lemon juice, which will give the cake some acidity and tanginess.
If you want to add even more lemon flavor, you can optionally add up to 2 teaspoons of lemon extract. This will add to the lemony taste, but won't add any tanginess, since most extracts do not contain any lemon juice or acid.
The Trick for the Most Lemony Buttercream
When adding lemon flavor to buttercream, things get a little bit trickier. We can only add so much liquid before the buttercream breaks, usually only about 4-5 tablespoons. Extracts are great, but they don't have that sour taste that I love, and that small amount of lemon juice only goes so far.
My trick to get around this is to actually dissolve extra citric acid into my lemon juice. The easiest way I have found to do this is to use this TrueLemon crystallized lemon powder since it is available in many grocery stores. But, you can also buy citric acid in bulk, which is a little more cost effective.
Just stir the citric acid into the lemon juice to make sure you dissolve all of the crystals. Then you can beat it along with a little lemon extract into the buttercream for the most lemony and silky buttercream!

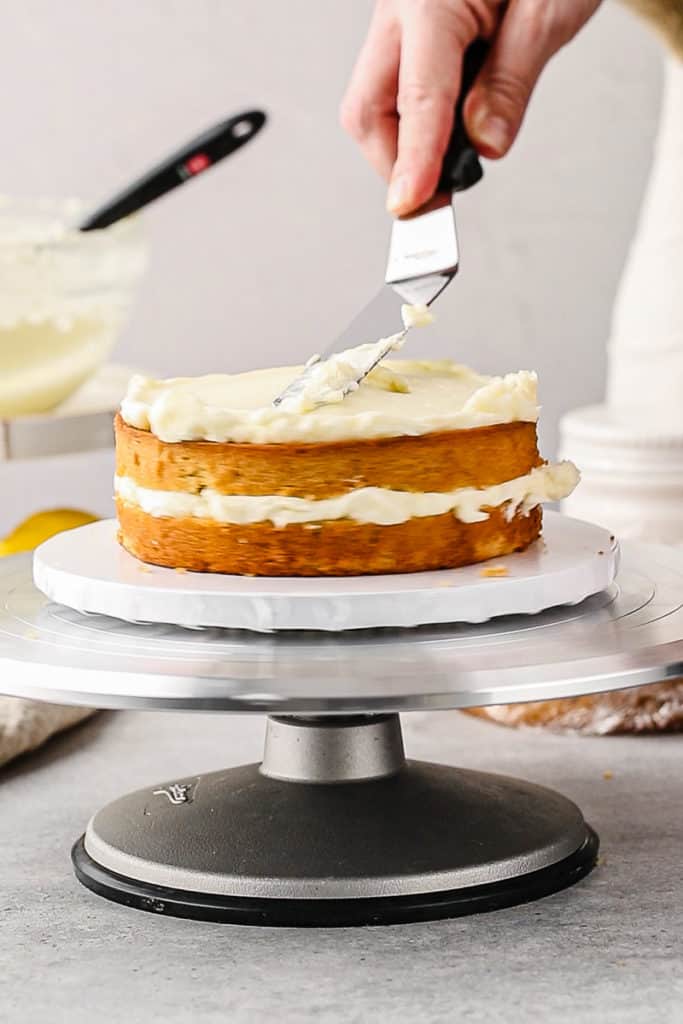
Torting the Cake Layers
This cake is baked in two 6" round pans, but you'll notice that there are four layers. This is because I've torted each of the cakes, which just means I cut them in half.
I am a huge fan of torting cakes, mainly because it creates, in my opinion, the best cake to frosting ratio! It also saves you from baking extra cakes. These cake layers end up being pretty tall, almost 2", so it gives ample room to cut them down to 1" layers.
To torte the cakes, I use a large serrated bread knife. It takes some practice to do this and get a straight line, but you can also use a cake leveler to torte if you have one.
Making the Cake
Mise en Place
The French term mise en place means getting everything in its place, and it makes baking so much easier. Read the whole recipe before you begin, and then measure out everything you need and have it all in one place before you mix anything. This also includes prepping your baking pan and preheating your oven.
Mixing the Batter
This batter is put together using the Reverse Creaming Method, also known as the Two-Stage Method. That just means that the flour and sugar are mixed together first, then the fat is added to coat the flour, and finally the wet ingredients are added in. I love this method because it's fast, easy and it actually protects you from overmixing.
In order to get extra flavor from our lemon zest, the best way to start is to mix the zest with the sugar and let it rest. The sugar will pull out the oils from the zest and create the best-smelling lemon sugar. After it rests, just add the flour, baking soda, baking powder and salt and whisk everything together.
Next, you'll add the softened butter to the flour mixture. Make sure it is at room temperature, because when you mix it in to the flour, you don't want any lumps of butter hanging around to create havoc in your cake structure. It should be totally incorporated into the flour and sugar mixture.
Then you'll mix in your oil, eggs, lemon juice and buttermilk. Add in the lemon extract at this point, too, if you're using it. Mix until everything is thoroughly combined, being sure to scrape down the sides and bottom of the mixing bowl. Once it looks combined, beat the batter for an extra 20-30 seconds to strengthen the cake structure.
Baking the Cake
Distribute the batter evenly into your two cake pans. Ideally, use light-colored cake pans to keep the bottom and sides from browning too much. I like these pans by Fat Daddio.
I also recommend using baking strips, which I saturate with water and wrap around the sides of the cake pan. This helps the outside of the cake to cook more slowly, and lets you get an even, flat top on the cake. If you don't have baking strips, another way to get a flat top is to bake at a slightly lower temperature for a longer time.
Bake with baking strips at 350°F (177°C/gas mark 4). The cakes will be done after about 30 minutes, when the internal temperature gets to 205°F (96°C) and the tops spring back when touched lightly with your finger.
Flavoring the Buttercream
You can find my favorite buttercream recipe here, but this will apply to any buttercream recipe! Once you have your buttercream mixed, juice your lemon. This will give you about one fluid ounce (two tablespoons) of juice. To that, add ½ teaspoon of citric acid or TrueLemon powder, and stir until dissolved.
Add the juice mixture along with lemon extract to the buttercream, and beat until fully combined. You can also add some food coloring at this point if you'd like.

Constructing the Cake
When the cake layers have come fully to room temperature, you will need to wrap them well in plastic wrap and chill them for 30-60 minutes before you begin cake construction. This will help them keep their shape and not fall apart when you torte and stack them.
I use a cake turntable to decorate cakes. If you don't have a cake turntable, putting a large, flat plate on top of a lazy susan can also work. Just make sure it is really stable and won't wobble as you work.
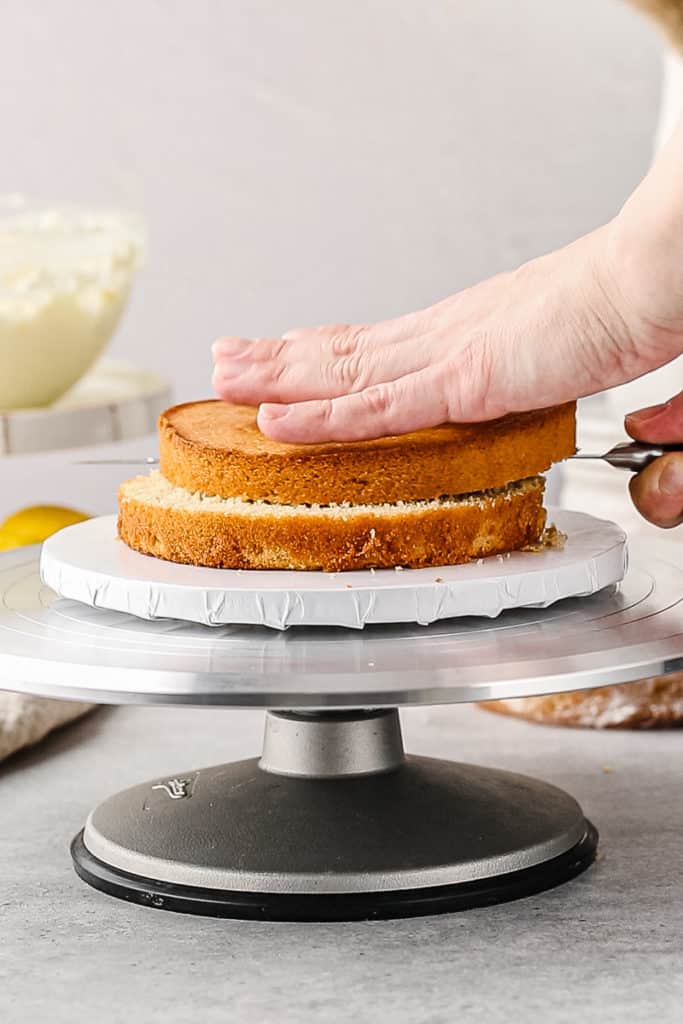
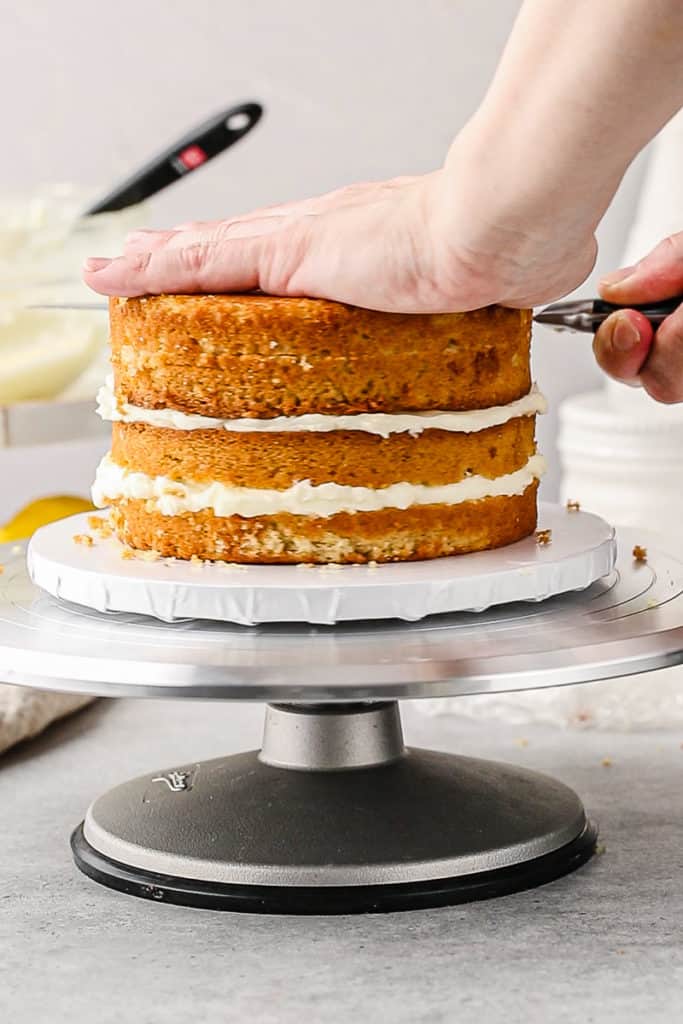
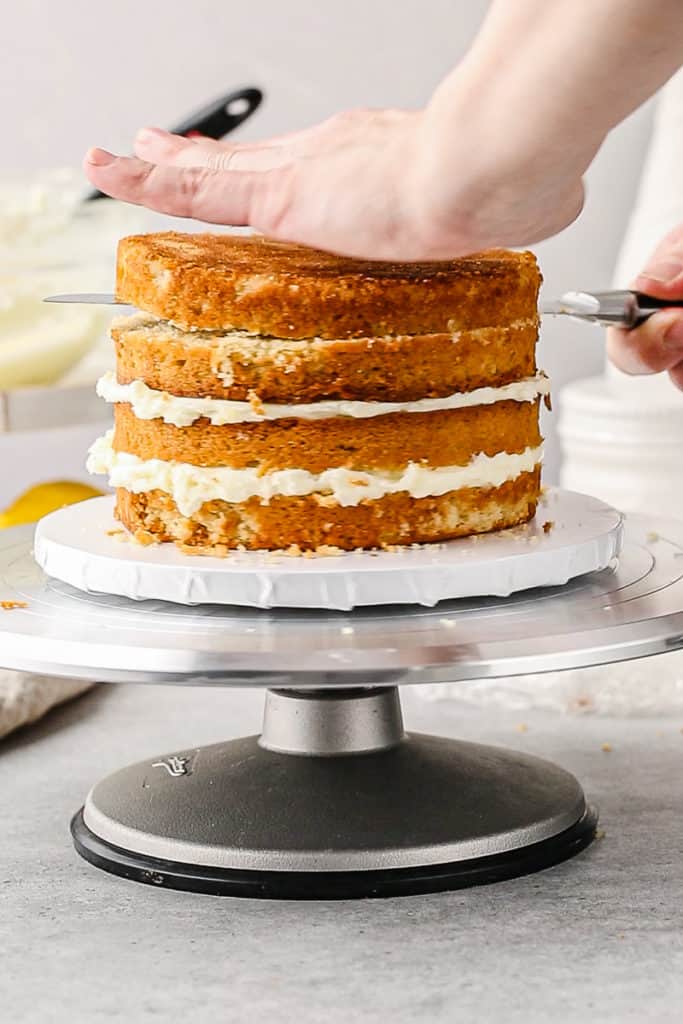
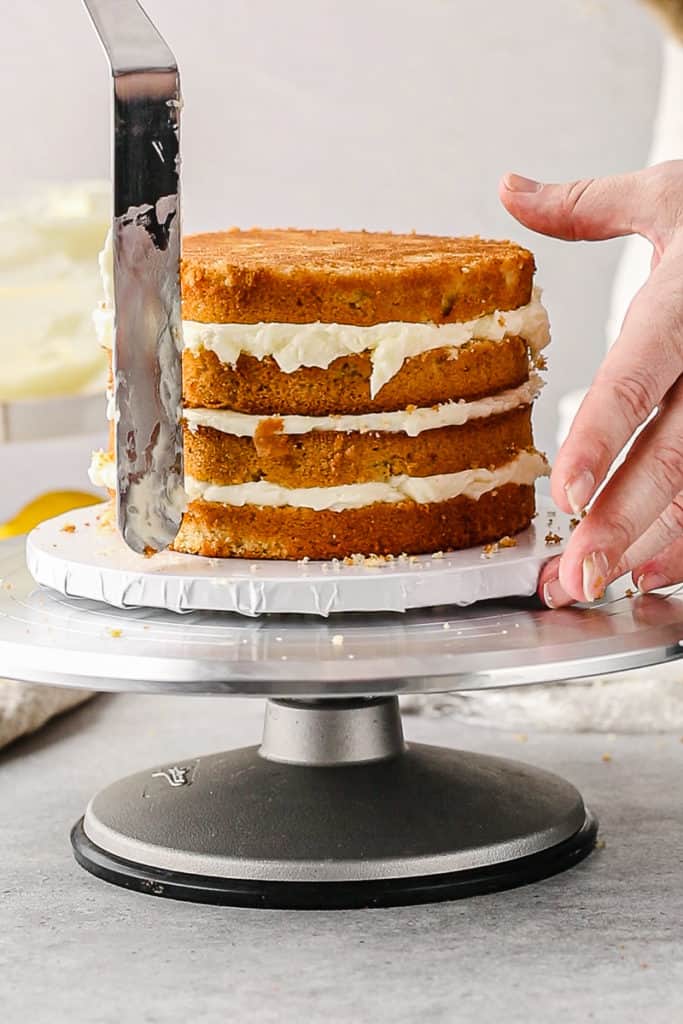
On a plate or cake board, put a little dollop of buttercream and place the first cake layer down on top. Using a cake leveler or a large serrated knife, cut the layer in half and carefully remove the top piece. Add a layer of buttercream, then place the other cake half back on, cut side down, and add another layer of buttercream.
In order to get a very flat top, I like to add the second cake on upside-down. I torted it while stacking, but you can torte first if you're using a cake leveler. Add the first piece on, another layer of buttercream, and then the last layer on top.

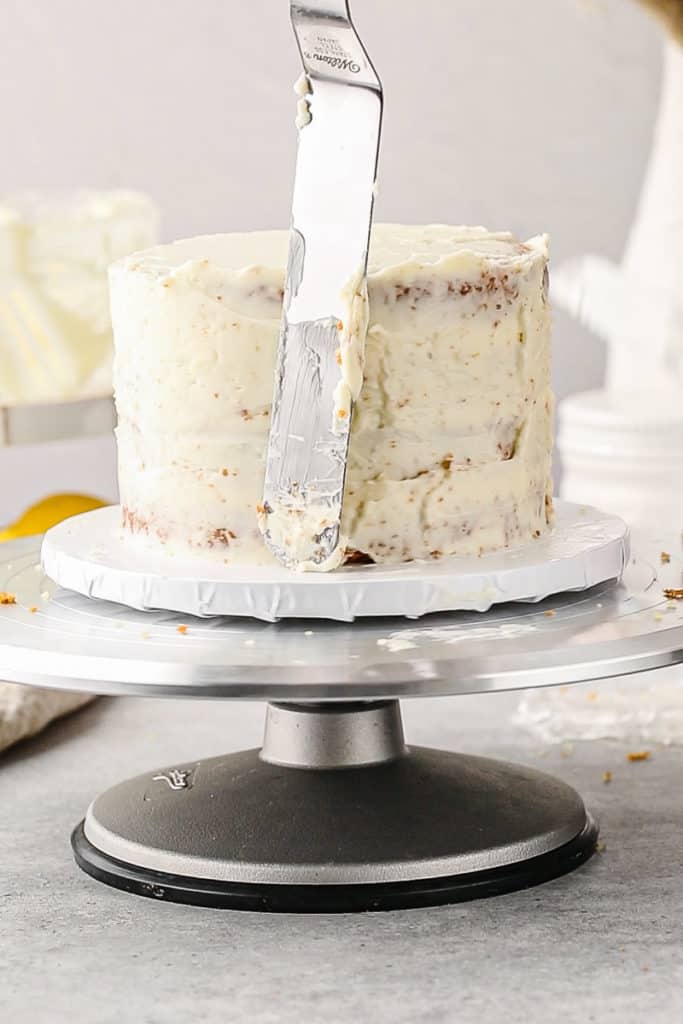
Crumb Coat, Chill and Frost
Now you'll add a thin layer of buttercream all over the cake. This is called the crumb coat and will help you catch any crumbs from the cake. After you're done, place the entire cake in the fridge until it is well chilled, about an hour.
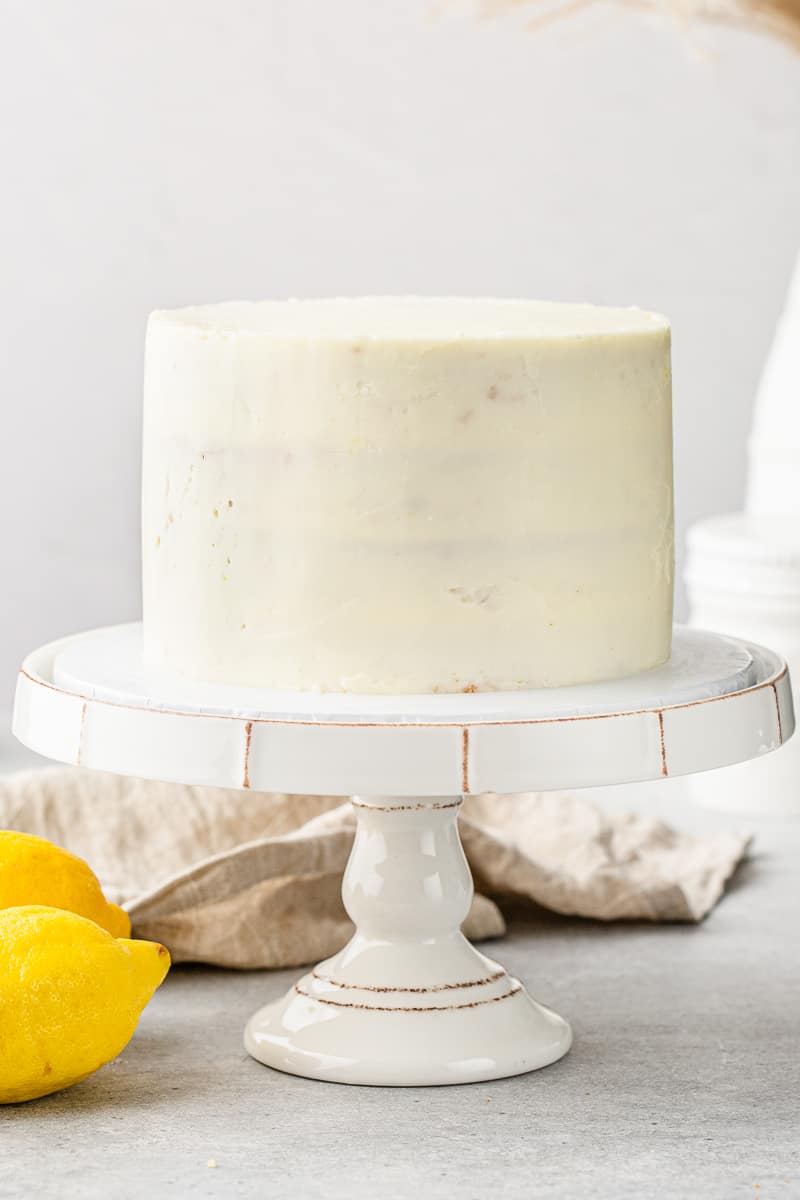
When it's nice and cold and the crumb coat is firm, take it out of the fridge. Now you can spread on the final coat of buttercream using an offset spatula. Then with the spatula or a pastry scraper, smooth the sides as much as you can, holding the scraper at a 45° angle to the cake as you turn the turntable. Smooth the top of the cake by pulling in from the side to the center of the cake.
When you're done, chill the cake about another 30 minutes to set the frosting, and then decorate however you like!

Other Recipes You Might Like
- This Blood Orange Pound Cake also has an amazing citrus flavor
- It would be cute to decorate this cake with some Homemade Raspberry Lemon Marshmallows
- This Vanilla Buttermilk Pound Cake is another showstopper
Did You Try This Recipe?
I would love to know if you made this cake! How did you like the extra tangy buttercream trick? Please leave me a star rating or comment below, I would love to hear from you!
📖 Recipe
Lemon Layer Cake with Lemon Buttercream
Equipment
- Stand mixer (recommended) or electric hand mixer
- Zester
- Two 6" round light-colored cake pans, or equivalent volume pans
- Parchment paper (recommended)
- Cake strips (optional, helps to get a flat cake top)
- Cooling rack
- Plastic wrap or airtight wrap
- Large serrated knife or cake leveler
- Offset spatula
- Pastry scraper (optional)
Ingredients
Cake Batter
- 200 g sugar 1 cup
- Zest of 1 lemon
- 185 g flour ~1.5 cups
- 1 teaspoon baking powder
- ½ teaspoon baking soda
- ¼ teaspoon fine grain salt
- 58 g butter, room temperature and soft ½ stick/¼ cup
- 70 g oil ⅓ cup
- 2 large eggs 100g
- 45 g lemon juice ¼ cup/2 fl oz/from 1 large lemon
- 60 g buttermilk ¼ cup/2 fl oz
- 1 teaspoon lemon extract or paste optional
Lemon Buttercream
- 1 liter unflavored buttercream
- 2 tablespoon lemon juice 1 fl oz/from ½ large lemon
- ½ teaspoon citric acid
- 1 teaspoon lemon extract
Instructions
Prepare
- Measure your sugar into a bowl and zest the lemon into the bowl of a stand mixer. Rub the zest into the sugar, cover and set aside.
- Preheat the oven to 350°F (177°C/gas mark 4).
- Cut out parchment rounds that will fit flat into the bottom of the cake pans. Spray the pans with baking spray and line the bottom of them with the parchment. Spray the parchment once more.
Make the batter
- Add the flour, baking powder, baking soda and salt to the sugar mixture. Using the paddle attachment of the stand mixer, mix well until combined.
- Add the softened butter and mix well, until everything is fully combined.
- Add in the oil and mix well.
- Add in the eggs, buttermilk, lemon juice and lemon extract if you are using it.
- Making sure to scrape down the bowl occasionally, mix until everything is combined. Once it is fully combined, beat for another 20-30 seconds to strengthen the batter.
Bake
- Add the batter to the two pans, using your kitchen scale to help you get about the same amount of batter in each pan.
- If you are using cake strips, saturate them with water and wrap them around the sides of the pans.
- Bake for about 30 minutes, until the tops of the cakes spring back and the internal temperature is 205°F (96°C).
- Allow the cakes to cool for about 10 minutes in the pan. Then flip them out onto a cooling rack and let cool to room temperature.
Flavor the buttercream
- Mix together the lemon juice and citric acid until the citric acid is fully dissolved.
- Add the juice and lemon extract (and food coloring, if you like) to the buttercream and beat until all is combined and the buttercream is fluffy.
Construct the cake
- Cut the cake layers in half using a large serrated knife or a cake leveler.
- Place the bottom layer of cake onto a cake board, securing it with a dollop of buttercream underneath. Place the cake board on a turntable. Add a layer of buttercream and then place the next layer of cake on top.
- Continue layering the cake and the buttercream, being sure to line up the layers so that they don't stick out further on one side. Once you place the last cake layer, smooth on a thin layer of buttercream as a crumb coat.
- Chill the crumb-coated cake for 30-60 minutes. Then add your final layer of buttercream all over the outside of the cake. Smooth the sides with a pastry scraper.
- Chill the cake again to set the buttercream and decorate as you like.
- This cake will keep, wrapped well, for about a week in the refrigerator. I recommend keeping it at room temperature only for about 30-60 minutes before you serve it (unless you like to eat it cold, which is great too!)
- You can also cut pieces, wrap them individually and freeze them in an airtight container.
Arielle says
Did you bake the lemons to keep them sturdy enough to stand up on top of your cake? Or do anything special?
Kimberly says
Hi Arielle! I actually purchased freeze dried lemons. If you bake them, they will dry out but get more brown. You can get the freeze dried ones on Amazon, here is the link (<- my Amazon affiliate link).